Installation Instructions
INSTALLATION INSTRUCTIONS FOR METAL EXPANSION PLUGS
HOLE PREPARATION
Refer to the data in the catalog to determine the diameter and tolerances of the cap seat (D2) and of the hole to be sealed (D1)
– The roundness of the hole must be within 0.05mm
– Hole roughness should be between Rz10-30 (Ra3.2-6.4) especially for hard materials
– Avoid spiral or longitudinal scratches as they can affect the performance of the cap
– Make sure the plug seat is clean and free from cutting oils, chips, etc.
INSTALLATION PROCEDURE
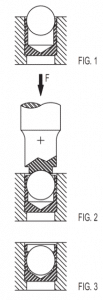
Insert the plug into the seat with the ball facing outwards and in contact with the internal shoulder. It is of fundamental importance that the diameter of the seat and of the hole to be plugged are of the correct dimensions so that the plug is adequately supported during installation and there is a good seal. (Fig.1)
Press the ball into the sleeve so that the top of the ball is slightly below the top level of the sleeve (See Figs. 2 and 3). Approximate S and X stroke values are listed in the table below.
Make sure you have the correct installation tool for each cap size.
The HC EXP-41, EXP-44, EXP-88, EXP-54 plugs can be installed using a hammer and the appropriate manual installation tool. A punch or pneumatic hammer with the appropriate installation tool can also be used.
HC EXP-41, EXP-44, EXP-88, EXP54 plugs can also be installed in an automated way.

